A common problem of the DBAs is to maintenance huge databases without creating downtime. On Amazon RDS, there are some techniques that can help to deal with it. See bellow the steps you’ll need to do to perform maintenance on huge tables.
Important to say that this tutorial was written to advanced DBAs, not for newbies. And is possible to something fails due particularities of your environment. So first of all, spent some time doing testes and lab testes.
Note: This tutorial will work on MySQL 5.6. The old MySQL 5.5 on AWS doesn’t supports some features like creating replicas from replicas.
This is useful when you want to:
- Add or remove lots of records;
- Change (alter) huge tables;
- Delete lots of records;
- Create table partitions.
- And others.
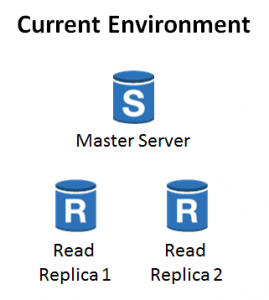
Let’s suppose this is your current scenario: you have one Master Server and two slaves replicating from Master: Read Replica 1 and Read Replica 2.
Step 1: Create a new Read Replica
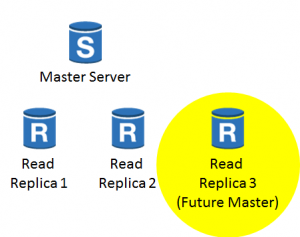
The first step you need to do is create a new Read Replica. This new Read Replica will be your Master Server on the future, after all the changes will be applied. I’ll call this “Read Replica 3”.
Step 2: Replica obligatory configuration
After creating your new Read Replica 3, you need to do some changes:
- Create a new Parameter Group setting the read_only to 0. This will enable you to the the changes you want on this instance (be careful):
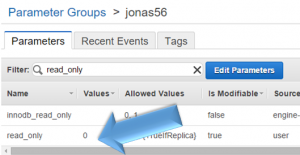
- Change the Parameter Group on Read Replica 3 to the new Parameter Group. Doing this, you’ll be able to change the data. You can damage the replication if you change something that is needed by the replication.
Step 3: Replica additional configuration
Do optional or conditional changes:
- Check if you’ll need more space on disk to do the changes. If so, you’ll need to increase disk space to do the changes. You’ll be able to decrease the space after.
- Convert from Magnetic so SSD.
Step 4: Do your changes
Connect to your Read Replica 3 and do all the data changes you want. You can alter tables, add partitions, add, update or delete records, etc. Again: be careful because you can broke the replication if you do any change that blocks the SQLs coming from Master binary logs.
Step 5: Create the new Replicas
Create new read replicas using the Read Replica 3 as the new master (it will continue being a slave, bu at the same time a master). Use the same configurations you have in the current Read Replica 1 and 2. In the illustration, they were called “Read Replica 1B” and “Read Replica 2B”.
Note: To do this, it’s necessary to activate the backup feature. If the backup feature is disabled, you will not be able to create new replicas. And remember, this works on AWS MySQL 5.6 (and maybe on new ones).
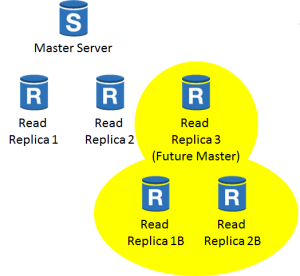
Check if the new structure is working well, without replication errors. This is the moment to bring your instances to the ideal configuration. I.E., if you increased disk space due tables changes, change again to reduce to the size you need. Remember to return the “Read Replica 3” and all instances to the correct Security Group.
At this point you’ll have a duplicated RDS structure, the old one and the new one, with your changes.
Step 6: Start to use
All the steps 1-5 you can do when your environment is running on production, because them doesn’t interfere on performance or stability. Now you’ll need to change this production environment.
The result will be:
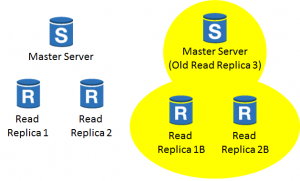
You’ll have two replication structures, the new one and the old one. On this moment, the structures doesn’t share any data.
You can do it in two ways: a hot change and a safe change.
Hot change: The dangerous way
It consists on pointing your application to the new instances. Doing this, your old server will not be useful anymore, because it will not receive the data anymore.
On environments that have lots of Writes, your slave can be “delayed” and have inconsistent data. So when you start to using it, it will create primary keys that already exists on master. This will be a huge problem and probably you’ll be fired (with reason). So before you do this, certify that your future master server (Read Replica 3) have a good capacity to be up-to-date.
Steps:
- Point the application to the new servers. Start with the Replicas.
- Promote the “Read Replica 3” to master, using the “Promote Read Replica”.
- Delete your old servers.
Cold change: The safe way
It consists on stopping your application, checking the data integrity and then starting the new pool. This is the method I recommend, because it’s safer and you’ll need just some minutes downtime. And in this method you don’t need to change the databases endpoint on your application, because you’ll rename the servers.
Steps:
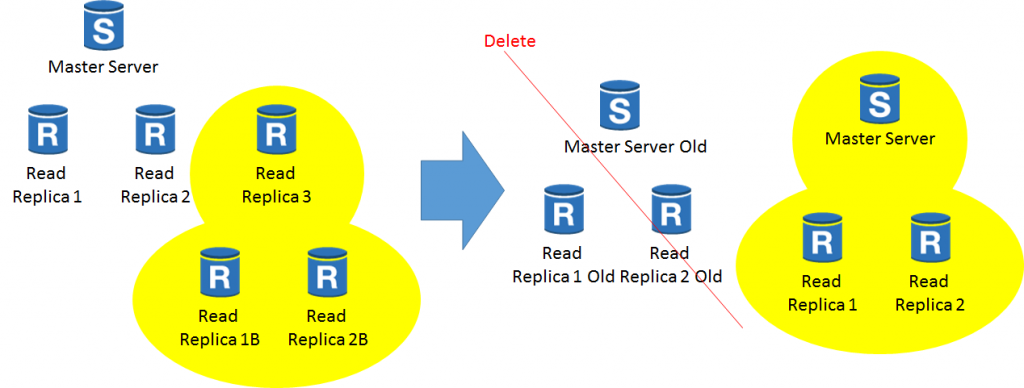
- Stop your application and/or any database changes. Ensure your database will not receive more connections/changes. Rename the “Master Server” to “Master Server Old” to prevent new connections. Replication will still working. Also rename the Read Replicas adding “Old” in the end: “Read Replica 1” will be “Read Replica 1 Old”. “Read Replica 2” will be “Read Replica 2 Old”.
- On the Master Server (Master Server Old), run the command “SHOW MASTER STATUS” to see the master position. Run the command “SHOW SLAVE STATUS” on the “Read Replica 3” to see if it’s synced. If not, wait until it will be fully synced.
- Now you are able to promote your Read Replica 3 to be a master. Promote it to master (this is fast), using the menu command.
- Rename the “Read Replica 3” to the old master name: “Master Server”. Do the same with the read replicas: “Read Replica 1B” will be “Read Replica 1” and “Read Replica 2B” will be “Read Replica 2”.
- Start your application and check if everything is running fine. Then delete your old servers.
Final Remarks
If you don’t know the MySQL replication concepts, don’t use this tutorial at this moment. If some problem occurs (and Murphy laws really exists on theses moments), I recommend you study a lot about replication after doing theses changes.
I hope you enjoyed this tutorial, because it can solve a lot of administration problems.


